Pages

Showing posts with label sewing for kids. Show all posts

Sunday, 8 January 2012

art caddy

I sewed something!  One of Oscar's buddies had a birthday party this weekend, and making a gift was just the motivation I needed to dust off the sewing machine. I made a little take-along art caddy in hopes that it will be useful in keeping a 3-year-old busy and happy.


There are lots of variations of this project floating around the internet, and I used bits and pieces of many of them.  I've referenced my favorite versions at the bottom of this post.  I didn't follow a specific tutorial partially because I wanted to create something unique, but mostly because I am feeling too tired to try and follow written directions.  :)

Is it silly that I am proud of myself for including a zipper pocket?  I have known how to sew zippers for a long time now, but for some reason I tend to shy away from them.   Zippers are not scary!  I need to remember that.


When you open the caddy, you find crayons and markers on the left, and a paper pad and an extra pocket for goodies like stickers on the right.

The fabrics for this project came from Riley Blake's Wheels line.  For inspiration or instructions on a similar project, check out the following blogs:

Spledorfalls: composition caddy
Simply Modern Mom:  kaye's sketchbook caddy
Sutton Gract: art notebook
{lbg studio}:  art journal

And now, for a gratuitous cute baby photo:


Can you believe it has already been 7 weeks since Cora was born?  Time really flies.  While I can't say it has been super fun so far, I sure do love her.

Wednesday, 2 November 2011

ruby's wonder woman costume

Hello! You'll find me over at Lil Blue Boo today, sharing a bit more about Ruby's Halloween costume.

If you aren't already keeping up on Ashley's story, you'll want to check out her posts on her recent battle with cancer.  I've always admired Ashley's work, but even more I admire her positive attitude and tenacity.  She is truly an inspiration, and it sounds like things are finally turning around for the better.  Hurray! 

Keep fighting, Ashley!  We love you.

Monday, 31 October 2011

halloween costume parade

Happy Halloween!

We had such a fun time at Oscar's birthday party this weekend - I have tons of photos, but I still need to go through them, so I'll share party details later this week.

Meanwhile, want to see all of our costumes? 

I made Jared a quick and easy robot costume by covering a large cardboard box in silver duct tape and cutting a bunch of vinyl decals with my Silhouette machine.  He really hates dressing up for Halloween, but he was sweet to humor Oscar (and me) for the party.


You've already seen Oscar's pumpkin costume.  It was too hot on Saturday to stuff him full, but we might try that for trick or treating tonight.  He was such a happy birthday boy.  The ear-to-ear smiles he wore all night made all the party prep worth it.

I made a pregnant pumpkin shirt with a simple freezer paper stencil and the new Martha Stewart Glitter Paint.   Not an elaborate costume, I know, but it was about all I could muster and it made Oscar happy.  We felt like a pretty cute pair of pumpkins. 
Here's our happy gang all together.  Ruby was Wonder Woman, and I am thrilled with how her dress came out.   She even wore the accessories happily, which was a miracle.   I'll post more on her outfit later.

I also made the costume for our friend Audrey (Oscar's party companion), as her birthday present.  She loves Beauty and the Beast, so I made her a Belle dress using the Crafterhours tutorial again.  Her baby sister wore Ruby's old Belle dress, so we had two little princesses running/crawling around the party.


I hope you have a very happy and safe Halloween!  Don't make yourself sick with candy.  :)

Here are the kids' costumes from previous years:

2010:  Skeleton and Baby Aerobics Instructor
2009:  Bluebird

Friday, 28 October 2011

rollie-pollie pumpkin

Oscar is a Halloween kid through and through.  He waffled on his costume selection at first (bat, pirate, star wars guy), but eventually he had only one request: a pumpkin! 

When I asked him to try on his costume for a photo, he said, "wait! I need a pumpkin.  It looks just like me."  So cute.


The hat was made using Delia Create's hat-ette tutorial.  It was so fast and easy to put together (literally less than a half hour!) and totally completes the look.  I used elastic instead of a ribbon tie, because I wanted it to be quick to put on and take off.


For the felt pumpkin suit, I used the Rollie Pollie bean bag pattern from MADE, with the small bag pattern pieces scaled down slightly.  The zipper in the pattern makes the costume really easy to get in and out of.  Instead of adding the top and bottom pieces, I made an elastic casing.   I cut arm holes in the side, and edged them with "bias" tape made from felt.   The arm holes are cut a little too large, but you can't win them all.

Or maybe you can?

For the actual costume day, he's going to wear and orange t-shirt and his green legging pj pants underneath, and we are going to stuff the pumpkin to fill it out a bit.

I am also going to be a pumpkin, but don't require any stuffing in my costume.  Only 3 weeks to go before baby girl #2 arrives.  :)

Monday, 24 October 2011

doll/bear carrier

Here's my latest project selection from the Oliver + S: Little Things to Sew book:

the bear carrier!   I'm telling you, this book is gold when it comes to making handmade gifts for children.  Every project is a big hit (I've also made several explorer vests and the red riding hood cape). 

This carrier was for another one of Oscar's friends, but we tried it on his favorite bear to get the straps sized properly.  He was ecstatic - hands free bear travel?  Life doesn't get much better.   "Let's try glow turtle next!" he says.

Can you imagine the tears when I had to package it up for the birthday party?  Oh, man, was Oscar mad.  I promised to make a special one just for him, which means Ruby will probably need one, too.   My to-do list never stops growing.

Wednesday, 19 October 2011

ruffly playdate dress

Did you participate in the Kids Clothes Week Challenge last week?  I intended to, but it didn't quite happen.  Too much else going on this month!  I'll have to look forward to it in the spring.

I did manage to make this fun little dress for Ruby, using the Playdate Dress pattern from Craftiness is Not Optional (I made it once before back in July).  It is such a breeze to put together - especially with the Ruffle Fabric, which saved me the step of hemming the bottom.  It looks really sweet on Ruby, but she is walking now and won't hold still for a photo.  You'll have to take my word for it.  :)

Sunday, 16 October 2011

red riding hood cape

Last week I made the Red Riding hood Cape from the book, Oliver + S: Little Things to Sew.  I can't say enough good things about this book!  I love every project.

The cape was for Oscar's friend's birthday, but I couldn't resist taking a photo or two before wrapping it up.  Oscar was happy to oblige, and I'm pretty sure he didn't even realize this cape is meant for little girls.


This was one of the easier rated patterns in the book, and is beautifully simplistic.  I hope our little friend enjoys the addition to her dress-up box.


Speaking of birthdays, guess who turned 3 yesterday?  I can hardly believe it - feels like just yesterday Oscar was a tiny burrito of a baby.  We are so glad to have him in our family.

Friday, 14 October 2011

simple felt trick-or-treat bags: templates and tutorial


As promised, here are the templates and instructions for making my simple felt trick-or-treat bags.  They really are easy, and unless you have to crank out 25 (like me), you should have plenty of time to make them before Halloween.  Hooray!

First I'll show you how to construct the basic bag. 

Main bag piece: 11 x 20 inches felt
Handle pieces:  (2) 12 x 1 inches felt or ribbon
To make the felt handles extra sturdy, cut two pieces of felt 12 x 1 inches and sew them together.  A simple seam down either side will do.  To clarify, cut four total 12 x 1 felt pieces for each bag, and sew two sets together, creating two 12 inch handles.

1.  With your main bag piece laying flat, pin your handles to the inside of the fabric (on the 11-inch side), approximately 2 inches in from the side, and overlapping the edge approximately 1 inch (as pictured below).


 2.  Sew the handle to the bag.  Repeat with the other handle.


3.  Decorate the front of the bag.  Templates and more details on each bag can be found further down this post.


4.  Fold the main bag piece, right sides together, lining up the side and top edges.  Sew a 3/8 inch side seam (about the width of your presser foot) on each side.


5.  Square off the bottom of the bag:  Match the side seam to the bottom fold of the bag, creating a triangle. With the open seam at the middle to lay flat, mark a line at the 2 1/2 inch wide point.  Sew a seam across the marked line and trim off the triangle, leaving about a 1/4 inch seam allowance.  Repeat with other side.


It will look like this:

 6.  Turn the bag right-side out and revel in the cuteness.


Now that we have the bag basics down, let's talk about the different variations:

The pumpkin is pretty straight-forward.  Follow the instructions above, using the jack-o-lantern face template provided.  I added a strip of green ric-rac across the top of the front of the bag (you'll need 11 inches), and then sewed a leaf on top.  The leaf was top-stitched for added detail.

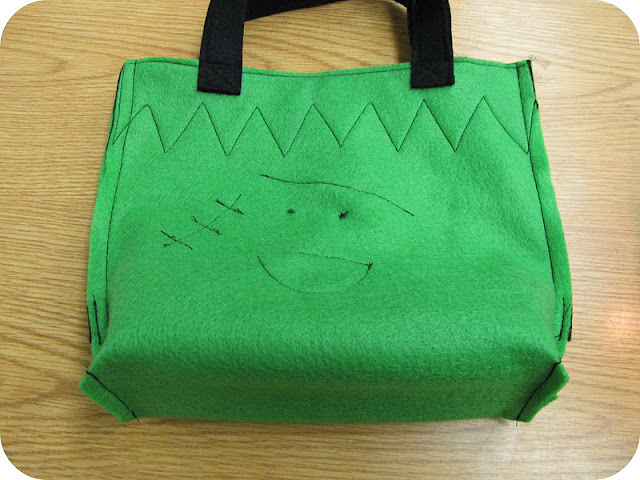
For the frankenstein bag, I used buttons for the eyes, and ric rac for the eyebrow (about 4 inches long).  You could substitute felt for both details.  For the neck bolt, cut out the 3 x 1 inch felt strip and fold it in half before sewing to the bag.   I placed the neck bolts 6 1/2 inches down from the top of the bag.  Make sure you pin them facing inward (the cut edge will line up with the bag's edge), so when you turn the bag right side out, the bolts will stick out.


The bat bag has a slightly different shape because I tapered the main bag piece 1 inch on either side (starting from midway up the side of the folded main piece) to give it a rounder appearance.  Otherwise, construction is the same.  Ric rac was added to the handles for a little extra color, and the mouth was stitched on with contrast colored thread.  Buttons for the eyes.  The wings are a single layer of felt, but you could make it a double layer for added stability (they are a little floppy).  Use the template piece from the jack-o-lantern nose for the bat's ears.

Click on the images below to download the pdf templates:


Happy trick-or-treating.  :)

Monday, 10 October 2011

simple felt trick-or-treat bags

Oscar is having a double Halloween birthday party with his little friend, Audrey.   It has been a lot of fun to plan, especially since I have a friend to work with (double the mom-power!).   We have been busily sewing felt trick or treat bags as party favors.  Here are the first three prototypes:

So far, we have a little army of pumpkin bags assembled, and the Frankenstein bags (my personal favorite) are all cut out, ready to be sewn next. 

These bags are ridiculously easy to make, and I'm putting together some templates for you ... they will definitely (probably, maybe) be ready sometime this week.  How's that for a vote of confidence?  Blogging is getting harder and harder by the day - Oscar doesn't nap in the afternoon anymore, I'm exhausted by the end of each day, and have thoughts of newborn preparations looming over my head (less than 6 weeks to go!).   You understand, right?  Thanks :)

UPDATE:  Find the templates and tutorial HERE

Friday, 30 September 2011

explorer vests!

Thanks to all who entered Tuesday's giveaway!  I am really enjoying reading through everyone's crafting memories.  It is so hard to narrow down favorites, but I'll choose my top five over the weekend and post the winners on Monday.

This week I've kept busy sewing birthday presents for Oscar's friends.  He is in a playgroup with kids that have birthdays all within about a month and a half of each other.  It is wonderful, but makes for an extremely busy birthday party season!

Oscar has two little friends who are especially adventurous and love the outdoors.  I knew the Explorer Vest from the book Oliver + S: Little Things to Sew would be just perfect for them. 


I made the first (khaki colored) vest with the simpler flat pockets, but couldn't resist adding the pocket bellows the second time around.  I used the lining fabric, so the bellows would really stand out.  It was fun to add bright touches in hidden places, too.  Hello, colorful pocket flaps!  Sewing for boys does not have to be boring.


I think my favorite part is the giant back pocket.   Not sure how easily a toddler will get his treasures back there, but I'm sure it will be entertaining to watch him try.  :)

Oscar keeps asking when I'll make him an explorer vest (he wants the accompanying bug-catcher box), so I'm sure you'll see more versions in the future!

Wednesday, 21 September 2011

Wee Wonderfuls Mermaiden Doll

A (long) while back, I received a copy of the book, Wee Wonderfuls, 24 Dolls to Sew and Love.  It is a very charming book - I immediately bookmarked a bunch of projects.  Somehow, they got knocked down the to-do list, but with many toddler birthday parties in the coming months, I pulled the book out again.

Last night I made the Mermaiden Doll.  Hello, beautiful!

It is a small-sized doll, only about 7 inches tall, perfect for little girls who like to take things on the go.  All of the stitching details add a lot of personality.

If you are planning to make dolls for holiday gifts, this book is a great place to start.  I love how diverse each of the projects is.  There really is something for everyone (even little boys!).

Up next on my dolls to make list are the Hansel and Gretel wooden spoon puppets, doxie necklace, and Little Miss Storybook (pictured below, left to right).

This little mermaid was hard to say goodbye to, but she'll be in good hands.  The birthday girl has such a love of swimming, she is practically a fish.  I'm sure these two will get along nicely.

Have you started thinking about handmade holiday gifts?  What is on your to-do list?

Tuesday, 6 September 2011

any guesses?

The fabric for Ruby's Halloween costume arrived today (yes, I know it is early, but with Oscar having an October birthday, I'm trying to get a jump on things).


Lots of metallic spandex, a bit of sequined knit, and a splash of gold faux leather, just for good measure.

Any guesses?

Sunday, 7 August 2011

a special request birthday shirt

My sister-in-law asked me to help with a birthday shirt for my niece's Jessie-themed birthday party.  How could I resist?  While her only request was to have a big number two, I couldn't help but try to create a Jessie-style t-shirt.


I used the Sienna Dress Pattern by Lil Blue Boo, shortened to t-shirt length.  The yellow top of the shirt is appliqued by machine, I added some blue hand embroidery to the border (you can just barely see it on Jessie's shirt, but the stitching is there), and the red swirls and number are flocked Silhouette heat transfer material.


Very Jessie, don't you think?  I looked everywhere to find that swirly pattern for my shirt, but came up with nothing.  In the end, I just sketched it out myself.  After getting the shape right on graph paper, I traced it using a thick black sharpie and scanned the image into my computer.  Then I imported the graphic into my Silhouette software and traced the outline to get the perfect cut.

You have no idea how this t-shirt has the wheels in my head turning for Halloween.  Thanks to a hilarious suggestion from my husband, Ruby is going to be rocking an awesome costume this year (fingers crossed).

Friday, 5 August 2011

viva la fiesta outfit

This weekend, the good people of Santa Barbara are enjoying Old Spanish Days, a.k.a. Fiesta - a celebration of the city's Spanish heritage.  Jared asked me to make Ruby a little outfit for his work party, and this is what I came up with:

It is not the traditional Fiesta dress he was hoping for, but I thought something casual would get more frequent wear.  Besides, it does include all the three most important elements of a great Fiesta outfit:

1.  LOTS of ruffles - the more the better
2.  vibrant color, especially red
3.  pretty flowers


check, check and ... check.  Mission accomplished!


  • The bloomers were made using Ruffle Fabric in Candy Cane and Dana's Perfect Diaper Cover pattern.  Before I sewed any seams, I serged all the cut edges of my Ruffle Fabric.  It really helped those wily ruffles stay in place and I didn't have to pin nearly as much.
  • I made the top from part of a men's t-shirt, using guidelines from Dana's Summer Vacation Dress pattern (notice a trend here?  I may have a favorite blogger).
  • The flower on the top and hair clip are made from the same t-shirt.  I cut long strips of connected scallops, and hand stitched them together in circular layers.

I'm off to eat copious amounts of churros.  Have a great weekend!

Followers

Blog Archive

Powered By Blogger