Pages

Showing posts with label freezer paper stenciling. Show all posts

Monday, 31 October 2011

halloween costume parade

Happy Halloween!

We had such a fun time at Oscar's birthday party this weekend - I have tons of photos, but I still need to go through them, so I'll share party details later this week.

Meanwhile, want to see all of our costumes? 

I made Jared a quick and easy robot costume by covering a large cardboard box in silver duct tape and cutting a bunch of vinyl decals with my Silhouette machine.  He really hates dressing up for Halloween, but he was sweet to humor Oscar (and me) for the party.


You've already seen Oscar's pumpkin costume.  It was too hot on Saturday to stuff him full, but we might try that for trick or treating tonight.  He was such a happy birthday boy.  The ear-to-ear smiles he wore all night made all the party prep worth it.

I made a pregnant pumpkin shirt with a simple freezer paper stencil and the new Martha Stewart Glitter Paint.   Not an elaborate costume, I know, but it was about all I could muster and it made Oscar happy.  We felt like a pretty cute pair of pumpkins. 
Here's our happy gang all together.  Ruby was Wonder Woman, and I am thrilled with how her dress came out.   She even wore the accessories happily, which was a miracle.   I'll post more on her outfit later.

I also made the costume for our friend Audrey (Oscar's party companion), as her birthday present.  She loves Beauty and the Beast, so I made her a Belle dress using the Crafterhours tutorial again.  Her baby sister wore Ruby's old Belle dress, so we had two little princesses running/crawling around the party.


I hope you have a very happy and safe Halloween!  Don't make yourself sick with candy.  :)

Here are the kids' costumes from previous years:

2010:  Skeleton and Baby Aerobics Instructor
2009:  Bluebird

Wednesday, 7 July 2010

road show costumes

The youth at my church are doing a performance for what we call a "road show" - basically the kids from each congregation in the area put together a short, musical-type skit, and then we all get together to watch and enjoy. I'm helping out with costumes. It's a good thing my mom arrived this week, because I'm not sure if I would have been able to get it done otherwise.

 
We have a group of cheerleaders in our skit called the Lucky Charms, so I made them lucky horseshoe shirts, some old-school pom pom hair bands, and a megaphone prop.  The shirts are kind of fun because I added glitter to the top coat of the stencil paint (these shirts are freezer paper stenciled) and attached some rhinestones using Elmer's Craft Bond Fabric and Paper Glue.  They should really sparkle under the stage lights.

Phew.  So glad these are done.

P.S.  I'm having a baby TOMORROW.  Wish me luck.  :)

Friday, 5 March 2010

at disneyland ... have a great weekend!


Some of the best people in the world flew into California for the weekend and we are all spending a couple of days at Disneyland.  No crafts to be spoken of ... just fun rides, a monte cristo sandwich, lots of board games, and hopefully a good dose of child-like wonder.

I made some simple mickey shirts for our little guys to wear, freezer paper stenciled, as usual.  I keep getting the same question - where can you buy freezer paper?  You should be about to find it at any grocery store.  I buy Reynold's brand, and it is usually right next to the aluminum foil and saran wrap.

Have a happy weekend!

Monday, 22 February 2010

geek chic

This weekend was my hubby's 30th birthday.  I've always thought that 30 is the perfect age.  Prime of your life.

Anyway, I had plans to continue the geek-cake tradition started last year, but Jared requested a chocolate pie.  I needed something special and homemade to add to his birthday, so I made him a freezer paper stenciled space invaders t-shirt using this cross-stitch pattern as my guide.

 
While I was in stencil-mode, I made a birthday t-shirt for me and Oscar.  Oscar's said "I love daddy" and mine said "I love Jared." Jared was so embarrassed when I wore my shirt out in public.  But if you can't proclaim your love on a t-shirt, what's the point?  :)


Monday, 7 December 2009

cozy car caddy tutorial

Thanks to everyone who voted for this project in the So You Think You're Crafty competition!  It was an exciting week.

Without further ado ...

Cozy Car Caddy Tutorial

Materials used:
two pieces of denim (17 x 10 inches and 17 x 6 inches)
one piece of Duck Cloth or other heavy fabric (17 x 10 inches)
gray and yellow felt (gray felt cut to 17 x 3 inches, yellow felt cut into seven 1 x 1/4 inch pieces
White Piping (two 17 inch pieces)
6" belting
1" Velcro
scrap fabric for applique
freezer paper, sponge brush, and acrylic paint
sewing machine and supplies


1.  Cut your fabric.  I used an old pair of jeans for the denim and duck cloth for the front.  Between the two heavy fabrics, it makes for a sturdy car caddy.
 
2.  Take your 17 x 6 inch piece of denim, fold it in half, and press.  This will be used for the car pockets.  Line up the raw edges of the denim with the bottom on the duck cloth and pin in place.  Sew along the bottom edge to secure.
 
3.  Sew vertical lines through all the fabric (3 layers, since the denim is folded in half), spacing the lines 2.75 inches apart.  Be sure to back stitch at the top and bottom.  If your child is especially rough on pockets, you may consider going over each line a second time.
 
4.  Sew your road piece centered in the top half of the duck cloth.  Pin the road dashes in place and sew around each dash using a coordinating thread.  Set the duck cloth aside.

5.  Add a car applique to the denim backing.  Center the car in the bottom half of the denim (see photo below).  When the caddy is folded together, the top half of the denim will be inside.
I used scrap cotton fabric for the car body and felt for the wheels.  You can use a fusible web like Wonder Under to hold your applique in place.  I was all out, so I just pinned and sewed. 
 
6.  Add decorative piping to the top and bottom of the denim backing.  Actually, add the piping all the way around as well ... I only had enough on hand for the top and bottom.  ;)
Line up the raw edge of the piping with the raw edge of the denim.  Pin in place and sew in place
along the existing stitch line on the piping.

7.  Pin the 6 inch piece of belting to the denim fabric, again lining it up centered on the edge of the bottom half of the denim piece (see photo above).  Leave about 1/4 to 1/2 inch overhang, so it will be enclosed between the denim and duck cloth layers when they are sewn together.  Stitch the belting in place using about a 1/4 inch seam (go over it a few times for extra strength)

I forgot to take a few pictures at this point ... bear with me.

8.  I added my velcro pieces last, but now would actually be a better time to do it.  Sew one side of the velcro to the end of your belting strap, and the other piece in the center of your car applique.

9.  Lay the denim piece and the duck cloth piece on top of each other, right sides facing together, and pin.  Sew around the edges using a 1/4 inch seam (try to follow the seam of the piping along the top and bottom).  Leave about a 3 inch gap for turning the caddy right side out.

10.  Turn the caddy right side out and pin the opening closed.  Sew around the entire outside edge again, closing the opening.  Go slowly around the bottom corners - all that denim gets thick.

11.  Fold the caddy in half horizontally and make a crease.  Sew a seam, following the crease, down the middle of the caddy (between the pockets and the road - see the final product photo for seam placement).  This will make the caddy easier to fold up.
 
12.  Using the templates found at the end of this post, cut the numbers out of freezer paper.  If you've never done freezer paper stenciling, you can find easy instructions at Angry Chicken (and everywhere else online - do a google search and I promise you'll find tons of help).

I sponged 3 light layers of white acrylic paint for my numbers (let each layer dry before applying another).

Fill your pockets with matchbox cars, and you are ready to roll.


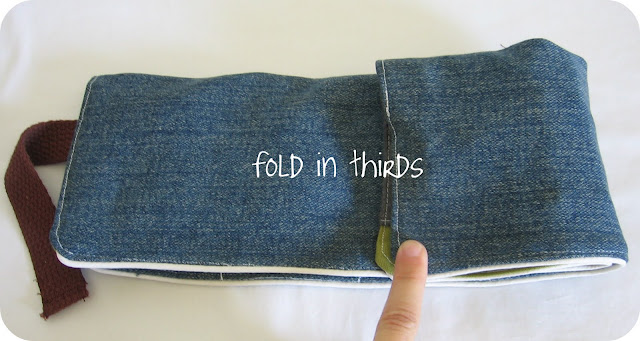
Here's how it folds:  Fold the caddy in half so the road meets the pockets.  Then fold in thirds.  Wrap the strap around the front and velcro closed.


Enjoy!

p.s.  This project is similar to Sharla's Car Cozie at My Little Gems, who I have just recently gotten acquainted with.  If you plan to make this project, you should check out her tutorial as well, since they are different and you might like her construction better. 

Also, check out this awesome car caddy/crayon roll combo project at Create Studio.  Love it!

post signature

Monday, 9 February 2009

a stencil for you

I haven't been doing a lot of crafting lately because Oscar is just way too much fun. Sometimes I just get in a funk and don't want to make anything! I'm ready to get back on the horse though, and will hopefully have a few new projects for you soon, including that wipes clutch I promised. In the meantime, enjoy this sock monkey stencil:

Just right click on the image to save it, and you can open it in a program like microsoft word to re-size to your liking. To use as a stencil, cut out all the black parts and you are set to go. You can find freezer paper stencil instructions at Angry Chicken (or all over the internet. Just google it, and I promise you'll find lots of help).

p.s. Oscar says hi!

Monday, 26 January 2009

maybe I'll open a t-shirt factory

I may be getting carried away. Freezer paper stenciling is so fun!

the assembly line

sock monkey shirt for our buddy Jack who is turning 2


Oscar's sock monkey shirt sadly went wrong. wah, wah....

Anyone know what makes the paint bleed? I did both onesies the same way.

Lastly, some little angel wings for Valentine's Day. I think Oz will make a cute cupid.

Followers

Blog Archive

Powered By Blogger