I assume you've all seen the adorable wooden doll projects at Lil Blue Boo? (They are plastered all over pinterest.)
Back in November, Ashley posted her Box o' Princesses and Boyville projects, and they have been on my mind ever since. Luckily my mom also wanted to make them, so we each painted a couple of sets while she visited. I know I wouldn't have gotten around to making them without her motivation, so thanks, mom!
First up, the boys:
I expanded the boy's set a bit to include a few more characters. If Ruby received eight dolls and Oscar only received four, he would not be pleased. Even with equal sets, I am still anticipating a lot of stealing between them.
My favorite boy dolls are Obi Wan Kenobi and Darth Vader (although Buzz and Woody are a very close second). Oscar is borderline obsessed with Star Wars. He's only seen Episode One (which pains Jared to watch), but he thinks anything Star Wars is just the greatest.
I sanded down toothpicks and painted them as light sabers. They are super-glued to the dolls for safety, so hopefully Oscar isn't disappointed that they aren't functional.
On to the girls:
This set is the same group of princesses that Ashley made, but I tried to add my own flare to each of them. My kids are young, so to avoid a choking hazard, I purchased bigger wood people (they are all 3 1/2 inches tall). The larger sized dolls made it easier to add a few extra details.
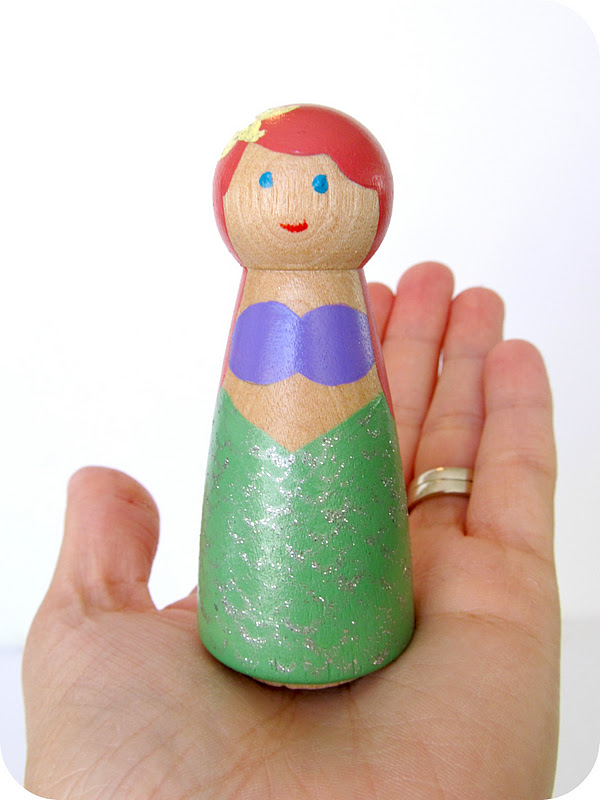
My favorite ladies are Ariel, Tiana and Cinderella. I used Martha Stewart glitter paint in silver to add sparkly scales to Ariel's fin. Cinderella's dress was painted with Martha Stewart pearl finish paint in "aquarium" - it turned out so perfectly shimmery (I just love the MS line of craft paints!). I didn't use any special paints for Tiana, but she sure has a fun dress.
I'm not going to lie, these dolls took a bit of time to paint. It's not an easy project to churn out in one night! But I sure am excited for Oscar and Ruby to open them on Christmas day. Hopefully they will enjoy playing with them. If so, it will give me an excuse to make more. I'd love to add a doctor, fireman, ballerina ... peg people are fun!
Have you made any homemade gifts for Christmas this year? I know it is only a week away, but I still have four projects on my list. Yikes.
wood source: I ordered my 3 1/2 inch peg people from Casey's Wood, and have always had a good experience with their products. However, Ashley linked to a different shop, Woodworks Ltd., and they have slightly lower prices - I can't speak for the quality.
women clipart, women artist, digital women planner, digital women com daily, digital women printables, digital woman, digital women art, 3d women
Showing posts with label crafts. Show all posts
Sunday, 18 December 2011
Monday, 12 December 2011
no-mess glittered ornaments
One of my personal Christmas traditions is that I like to make a few new ornaments for my tree each year. They almost always involve glitter. I was talking to my sister earlier today and she remarked that if she could find a way to work extra glitter into every season, it would make her life a little happier. I agree completely - glitter makes me happy.
This year I still got the glitter I love without the accompanying mess. These kid-friendly (i.e. non-breakable) ornaments are made with wood discs and glittered cardstock. They are totally low-fuss, low-mess, high-sparkle. You should be able to find all of the supplies at your basic craft store.
First I used a small amount of hot glue to adhere a ribbon loop to each wooden disc. Then I glued my cut paper to on each side of the disc using Mod Podge. I used my Silhouette Cameo to cut the glittered circles and little shapes, but you could just as easily use a paper punch, or even cut them out by hand.
It wasn't long before I had a large set of glittery, festive new ornaments.
They really shine against the lights of the tree.
I also made a set of ornaments with my family's initials. They found a home on our newly decorated mantel (which also features glittered trees, a holiday book wreath, and felt candy cane garland from crafts of Christmas past).
I hope you have had a very merry December so far! We've been battling sickness at my house. A week after Cora was born, my husband came down with shingles and then Oscar and Ruby both caught chicken pox (and yes, they were both vaccinated). Talk about the worst transition period, ever. I wouldn't have gotten through it without my mom being here, continually saving the day! It looks like things are on the upswing now, though. Keep your fingers crossed for me that this little sweetie remains chicken pox-free, would you?
Monday, 3 October 2011
kid craft: easy pipe cleaner spiders
My son, Oscar, loves Halloween. Whether that love stems from his October birthday or the fact that we did like 4 trick or treating sessions last year, I'll never know (I have my suspicions), but he really looks forward to it. Last week we started decorating the house at his request, and one of the new items we made was a set of easy pipe cleaner spiders. We stick to the fun and friendly side of Halloween around here.
They couldn't be more simple - the only supply you need is black pipe cleaners. The project is easy enough for school aged children, and quick enough to keep the attention of observing toddlers.
1. You'll need 7 pipe cleaners for a large spider.
2. Twist 2 pipe cleaners together to make one large strand.
3. Wind the long strand around your finger to create the body. You want it to look nice and round, but still have a hole through the middle.
4. Take four more pipe cleaners and twist them together in the center to create the eight spider legs.
5. Thread the legs through the hole in the body so there are four legs on each side.
6. Bend the legs on either side, and spread them out a bit.
7. Twist the end of each leg to create a little foot.
8. Using your last pipe cleaner, wind it into another ball, leaving a slight tail at the end. Tuck the tail into the body of the spider towards the front, creating a head.
All done! We made a little family of spiders to add to our mantle. Have you started decorating for Halloween?
Thursday, 8 September 2011
an even easier diaper wipes case
There is no fooling you guys - most of you were spot on with your guesses about Ruby's costume in the last post. I'll wait until I've actually sewn something wearable before I make a reveal though Snow White or Wonder Woman? I'm sure you'll lose sleep over the anticipation. :)
This week I made a diaper wipes case for a friend's baby shower, but I wasn't in the mood for hot-gluing (every once and a while I like to save my fingertips).
Instead, I got out my vinyl and cut an all-over pattern using my Silhouette machine. The front had the pattern only, fudged slightly on that center flap.
The back has the same pattern repeated, and the mommy-to-be's last name in the center. I doubt she'll ever grab the wrong case at the playground now.
You don't need a Silhouette to make one of these (although that certainly makes the process quicker and more precise). Vinyl can always be cut by hand, and I think even Contact Paper would work well. I recommend using a premium or outdoor vinyl if you can get your hands on it, since the adhesive is stronger and hold up to more abuse.
I saved my template pieces for the front and back of the case, so let me know if you'd like me to post them!
UPDATE: You can find the wipes case template posted HERE.
This week I made a diaper wipes case for a friend's baby shower, but I wasn't in the mood for hot-gluing (every once and a while I like to save my fingertips).
Instead, I got out my vinyl and cut an all-over pattern using my Silhouette machine. The front had the pattern only, fudged slightly on that center flap.
The back has the same pattern repeated, and the mommy-to-be's last name in the center. I doubt she'll ever grab the wrong case at the playground now.
You don't need a Silhouette to make one of these (although that certainly makes the process quicker and more precise). Vinyl can always be cut by hand, and I think even Contact Paper would work well. I recommend using a premium or outdoor vinyl if you can get your hands on it, since the adhesive is stronger and hold up to more abuse.
UPDATE: You can find the wipes case template posted HERE.
Wednesday, 6 April 2011
spring church party 2011
Please forgive my recent absence ... things have been busy around here! Last night we had our annual spring celebration for the women's organization at my church. I had a lot of fun with the decorations this year - the theme was light-oriented, so we went overboard with lanterns, twinkle lights, and etched candle votives (75 of them!). And of course, lots of pretty flowers. You can never go wrong with flowers.
It was a special evening with delicious food, a fun atmosphere, and lovely company. And I'm not kidding on the food - our dessert bar included vanilla bean creme brulee. My mouth is still watering!
p.s. I found my white paper lanterns for a great price at The Paper Lantern Store. I went with the 10 inch lanterns, and they were a nice quality and the perfect size.
Thursday, 27 January 2011
diaper cake - an oldie, but a goodie
Get ready for some baby-themed goodness in the next several posts. I helped with a friend's baby shower this week and one of the things I made was a diaper cake using my original diaper cake tutorial.
I did fudge the supplies a bit. Instead of using a telescoping mail tube, I substituted two heavy weight cardboard tubes. One was a wrapping paper tube (again, heavy weight - the flimsy ones won't work well), and the other was the tube from inside a roll of Silhouette vinyl. Waste not, want not! They need to be two different sizes so one fits inside the other. The tubes hold the cake layers together, but they are still easy to separate.
I also changed the way I layered the diapers. Instead of rolling each diaper individually, I wrapped them around the tubes. I liked that the edges of the cake were smoother, and it also enabled me to use double the diapers (this cake held 80 size-1 diapers). It also meant a LOT fewer rubber bands. Only three large bands used on the whole cake - one for each tier.
I made the banner cake topper on my Silhouette and glued it to two white lolly pop sticks. The sticks slid right between the diapers and held in place well.
Like the original cake, I decorated this one with paper flowers. The flower decorations were cut on my Silhouette using the 3-D Ruffle Flower from the online store. Each flower was glued to a mini clothes pin, so they just clipped onto the outer ribbons on the cake tiers. Maybe the mama-to-be can find a way to re-use the flowers? I'd probably attach them to gifts in lieu of bows, or maybe string them together on ribbon to make a cute garland.
Speaking of ribbon, I found that fabulously wide green satin ribbon at Michael's - it is 4 inches wide, which is perfect for a diaper cake because what do you know ... little diapers are also 4 inches wide.
The ribbon was attached with a few straight pins into the back of the cake.
With my extra paper I made a few more flowers as a table decoration and a paper banner to hang.
Pin It
I did fudge the supplies a bit. Instead of using a telescoping mail tube, I substituted two heavy weight cardboard tubes. One was a wrapping paper tube (again, heavy weight - the flimsy ones won't work well), and the other was the tube from inside a roll of Silhouette vinyl. Waste not, want not! They need to be two different sizes so one fits inside the other. The tubes hold the cake layers together, but they are still easy to separate.
I also changed the way I layered the diapers. Instead of rolling each diaper individually, I wrapped them around the tubes. I liked that the edges of the cake were smoother, and it also enabled me to use double the diapers (this cake held 80 size-1 diapers). It also meant a LOT fewer rubber bands. Only three large bands used on the whole cake - one for each tier.
I made the banner cake topper on my Silhouette and glued it to two white lolly pop sticks. The sticks slid right between the diapers and held in place well.
Like the original cake, I decorated this one with paper flowers. The flower decorations were cut on my Silhouette using the 3-D Ruffle Flower from the online store. Each flower was glued to a mini clothes pin, so they just clipped onto the outer ribbons on the cake tiers. Maybe the mama-to-be can find a way to re-use the flowers? I'd probably attach them to gifts in lieu of bows, or maybe string them together on ribbon to make a cute garland.
Speaking of ribbon, I found that fabulously wide green satin ribbon at Michael's - it is 4 inches wide, which is perfect for a diaper cake because what do you know ... little diapers are also 4 inches wide.
The ribbon was attached with a few straight pins into the back of the cake.
With my extra paper I made a few more flowers as a table decoration and a paper banner to hang.
I knew it was a good looking cake when one of the ladies at the baby shower asked when we were going to cut into it.
Pin It
Sunday, 21 November 2010
Silhouette SD Giveaway! (CLOSED)
I was over the moon when Silhouette contacted me about doing a second giveaway. It was love at first cut when I tried it for the first time last June, and now it easily ranks in my top 5 favorite crafting tools. I use it for everything - party decorations, wrappings for baked goods, gifts, gift tags, clothes for my kids, etc, etc. It is already coming in really handy (and saving me money) this holiday season for decorations and gifts.
Here are the Silhouette projects I've had up my sleeve lately:
I cut fall leaves to attach as gift tags to yummy pumpkin bread loaves - a great way to dress up your baked goods for gift giving and customizable to any occasion or season. I cut my leaves nice and large, so there was plenty of room to write a note on the back.
The women's group at my church made 30 sets of Christmas Advent Blocks, using instructions I found at How Does She? We mod podged the blocks with cute holiday papers and applied vinyl numbers and lettering that I cut on my Silhouette. At a cost of only $2 per set, this makes a great small gift for just about anyone on your list.
My friend, Sonja, recently threw a Sesame Street/Elmo themed party for her daughter's second birthday. She loves paper crafts and was painstakingly cutting out all her Elmo decorations by hand, until I reminded her of my magical machine that cuts whatever you want. In no time, we had cut alphabet and number garlands and some Oscar the Grouch, saving her time and money.

Did you know you can import pictures from the internet or your camera to the Silhouette cutter? You aren't limited to the (thousands of) images in the online store. Which means you can cut anything you want. Which is awesome.
I made lots of onesies over the summer using the Heat Transfer material, and now I am using it to make custom t-shirts for Christmas gifts. I applied this dinosaur silhouette to one of Oscar's shirts - the tail wraps around to the back.
If you want to make your favorite guy a gift this Christmas, the Heat Transfer is a great option. It is easy to do and looks so professional. The hardest part is just picking the design he'll love most!
Ok ... so my new favorite thing to make with the Silhouette is temporary tattoos. My nephews are all getting silly mustache finger tattoos in their stockings this year.
You actually don't need the Silhouette cutter to make the tattoos - you can buy the tattoo paper, print from your home office, and cut them out with scissors. So if you're looking for the perfect stocking stuffer for your Justin Bieber-crazed tween, or tough to please 9-year old boy, some fun temporary tattoos might be your perfect solution.
If you still aren't convinced this is the best cutter out there, here are some links to my past projects:
So ... on to the giveaway! One very lucky winner will receive their very own Silhouette SD Machine (a $299.99 value). The package includes:
- a Silhouette machine
- Software for Windows XP/Vista, Mac
- Power cable, USB cable
- 2 Cutting mats (one for thick media, one for thin media)
- One cutting blade
- $10 gift card to the Silhouette Online Store
This giveaway is now closed. Thanks for entering!
There is only one entry per person. If you accidentally enter more than once, please delete your duplicate comment (you will likely have to scroll to the end of the comments to view yours).Make sure I have a way to contact you! Either your profile must link back to a public blog, or you must leave me an email address to contact you. Anonymous comments (with no contact information) will be deleted.You can only win one Silhouette. If you have won a Silhouette here or anywhere else in blogland, you are no longer eligible.
I'm also excited to announce a special Cyber Monday deal!
It is only valid on Monday, November 29, 2010, starting at 4 am and ending at midnight the same day.
Here's the deal ...the Silhouette will be sold for $199 (originally $299). Silhouette America has NEVER sold these cutters for this cheap! This is the newest version with more capabilities and newest technology - the Silhouette is now Mac compatible.
It gets better ... the Cyber Monday deal will also include:
1 Roll of Cream vinyl ( $7.99)
1 Roll of transfer paper ( $7.99)
1 Home decor CD (Value $55)
Total ($70.98)
1 Roll of transfer paper ( $7.99)
1 Home decor CD (Value $55)
Total ($70.98)
All for only $199 - almost $200 in savings!
I'll have the discount code posted bright and early next Monday at 4 a.m. Eastern Standard Time. In the meantime, leave a comment and keep your fingers crossed to win!
Friday, 12 November 2010
hot chocolate gift tins
Last night, the ladies at my church got together for a little holiday kick-off - complete with crafts! I was in charge of putting together two holiday craft ideas. The first was hot chocolate gift tins.
I saw these tins last holiday season on the Blonde Design Blog. Kristin was nice enough to provide labels and a source for the tins, so all I had to do was follow her lead. :)
The beauty of crafting as a group is you can buy in bulk. We made well over 100 tins last night, and the cost of each kit (minus the cocoa) came to only about $1. Each kit included:
Speaking of marshmallows, last night I had sweet potatoes (topped with marshmallows) that were so delicious, I wasn't even sad that I couldn't eat pie for dessert. I just had another scoop of potatoes. mmm ... sweet potatoes. I love Thanksgiving.
I saw these tins last holiday season on the Blonde Design Blog. Kristin was nice enough to provide labels and a source for the tins, so all I had to do was follow her lead. :)
The beauty of crafting as a group is you can buy in bulk. We made well over 100 tins last night, and the cost of each kit (minus the cocoa) came to only about $1. Each kit included:
- 8 ounce tin - Paper Mart
- Hot Chocolate label - Blonde Designs Blog
- clear cello bag (2 1/2 inches long, 2 inches wide, 6 inches tall) - Paper Mart
- white scallop seal - I used a Martha Stewart Scallop Punch on full-sheet label paper to make stickers to seal the cello bags. You can find full-sheet label paper at any office supply store.
- length of baker's twine - Supply Owl
- punched gift tag - I glued holiday-print scrapbook paper to white cardstock and punched using a gift tag-shaped punch
Speaking of marshmallows, last night I had sweet potatoes (topped with marshmallows) that were so delicious, I wasn't even sad that I couldn't eat pie for dessert. I just had another scoop of potatoes. mmm ... sweet potatoes. I love Thanksgiving.
Wednesday, 20 October 2010
Oscar's car party
Top: 1. race car coloring track 2. decorated styrofoam cooler 3. paper pennant bunting
Middle: 4. watch-me-grow birthday banner 5. 90-minute birthday shirt 6. party favor bags
Bottom: 7. race car water bottle labels 8. race car crayons 9. cupcake toppers
Oscar's birthday party was supposed to be at the park, but the weather was uncooperative. :( We moved the party inside to our apartment to avoid the rain, and although it was close quarters, we all had a great time.
I used Pingg.com to send out invitations. Normally I am not a e-vite sort of girl, but it really kept things simple and it was nice to have the rsvp's tracked automatically. Did you know you can use your own image to create your invitations? I designed the little red race car using a combo of MS Paint and Picnik.com and then used it in the invitations and party decor.
All of the little guests were 2 years old, so we avoided organized games and activities. Instead, we set out a large piece of craft paper with a painted road to color with race car crayons and Oscar's new car playmat with a big bucket of matchbox cars to zoom around.
My Silhouette craft cutter saved a lot of time with the party decorations. I used it to cut the pennants for the bunting, the backing for the watch-me-grow birthday banner, and the little cars that decorated the styrofoam ice cream cooler.
I ordered a giant red balloon in hopes of extra cute birthday photos. In my mind I pictured a bright sunny day at the park, little boy, big balloon. Instead, it has rained for the last 4 days straight and I don't have a good photo of Oscar with his balloon, which is now sagging. :( Oh well, you can't win them all. You can find big round balloons HERE at Darlybird.
Oscar's birthday shirt was a 90-minute shirt with a big number 2 appliqued on the front. It matched his car playmat because yes, I am that crazy.
Here are some images I created for Oscar's car party, which you are welcome to save for personal use. Upload them to a photo editor (I use Picnik) and they are easily customizable to any age party.

Monday, 11 October 2010
DIY molded crayons
Sorry about last week. I realized Oscar's birthday was quickly approaching (this Saturday - can you believe he is already two?!!) and switched gears to birthday party/gift crafting. The blessing dress pattern is on the temporary back burner, but is back on the schedule for next week.
In the meantime, I have all kinds of party stuff going on. What started out as a small and simple party is becoming a small party that I am making a million things for. I can't help myself. :)
First up, race car crayons!
The theme for Oscar's party is cars, so last night I made race car shaped crayons to include in the kids' favor bags.
You won't believe how easy this is. (Sorry about the icky, dark action shots. This is not a project you want to do with your kids around, so I took these in my dark kitchen at night).
First, break up your crayons and put them in a double boiler (I used a tin can in a pot of water).
Melt them down over boiling water. I used a wooden dowel to stir.
Pour the melted wax into a plastic chocolate mold (I ordered mine HERE). DO NOT touch the tin can with your bare hand. It gets crazy hot.
Let cool in the refrigerator or freezer. When they are fully set, they'll slide right out of the mold!
So easy. So inexpensive. I used a Michael's coupon to get a big 120-count box of Crayola crayons on the cheap and was able to make 46 race cars.
With so many great chocolate molds available, you could customize this project to just about any theme. I'd love to make a train crayon set or a zoo animal set. How fun!
Subscribe to:
Posts (Atom)
Followers
Blog Archive
-
▼
2012
(33)
-
▼
January
(33)
- We're number 1!
- baby bear hat
- Are federal government workers overpaid?
- How much would a Buffett Tax raise?
- Support from Anonymous
- For High School Teachers and Students
- Two Reactions to the SOTU
- At least I am consistent
- ruffle tunic
- How to Reform the Tax System
- Penn World Table Bleg
- Mitt Romney and His Economic Advisers
- A Conference for Undergrads
- On SOPA
- Five Observations about Progressivity
- Should I put this award on my CV?
- Home for the Holidays
- Sad News
- The Strategic Bequest Motive
- The Santorum Tax Plan
- Dear Student
- Judging Presidents
- The Liquidity Trap may soon be over
- How much are new econ PhDs paid?
- How to Reduce Traffic Congestion
- art caddy
- Pigovian taxes save lives
- butterflies
- A Few Days in the Windy City
- De Gustibus non est Taxandum
- The Reincarnation of Keynesian Economics
- Things I did not say
- Economics Humor
-
▼
January
(33)