women clipart, women artist, digital women planner, digital women com daily, digital women printables, digital woman, digital women art, 3d women
Friday, 14 October 2011
simple felt trick-or-treat bags: templates and tutorial
As promised, here are the templates and instructions for making my simple felt trick-or-treat bags. They really are easy, and unless you have to crank out 25 (like me), you should have plenty of time to make them before Halloween. Hooray!
First I'll show you how to construct the basic bag.
Main bag piece: 11 x 20 inches felt
Handle pieces: (2) 12 x 1 inches felt or ribbon
To make the felt handles extra sturdy, cut two pieces of felt 12 x 1 inches and sew them together. A simple seam down either side will do. To clarify, cut four total 12 x 1 felt pieces for each bag, and sew two sets together, creating two 12 inch handles.
1. With your main bag piece laying flat, pin your handles to the inside of the fabric (on the 11-inch side), approximately 2 inches in from the side, and overlapping the edge approximately 1 inch (as pictured below).
2. Sew the handle to the bag. Repeat with the other handle.
3. Decorate the front of the bag. Templates and more details on each bag can be found further down this post.
4. Fold the main bag piece, right sides together, lining up the side and top edges. Sew a 3/8 inch side seam (about the width of your presser foot) on each side.
5. Square off the bottom of the bag: Match the side seam to the bottom fold of the bag, creating a triangle. With the open seam at the middle to lay flat, mark a line at the 2 1/2 inch wide point. Sew a seam across the marked line and trim off the triangle, leaving about a 1/4 inch seam allowance. Repeat with other side.
It will look like this:
6. Turn the bag right-side out and revel in the cuteness.
Now that we have the bag basics down, let's talk about the different variations:
The pumpkin is pretty straight-forward. Follow the instructions above, using the jack-o-lantern face template provided. I added a strip of green ric-rac across the top of the front of the bag (you'll need 11 inches), and then sewed a leaf on top. The leaf was top-stitched for added detail.
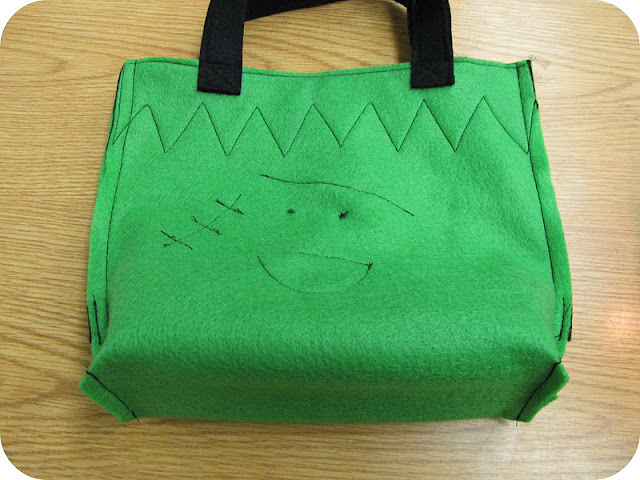
For the frankenstein bag, I used buttons for the eyes, and ric rac for the eyebrow (about 4 inches long). You could substitute felt for both details. For the neck bolt, cut out the 3 x 1 inch felt strip and fold it in half before sewing to the bag. I placed the neck bolts 6 1/2 inches down from the top of the bag. Make sure you pin them facing inward (the cut edge will line up with the bag's edge), so when you turn the bag right side out, the bolts will stick out.
The bat bag has a slightly different shape because I tapered the main bag piece 1 inch on either side (starting from midway up the side of the folded main piece) to give it a rounder appearance. Otherwise, construction is the same. Ric rac was added to the handles for a little extra color, and the mouth was stitched on with contrast colored thread. Buttons for the eyes. The wings are a single layer of felt, but you could make it a double layer for added stability (they are a little floppy). Use the template piece from the jack-o-lantern nose for the bat's ears.
Click on the images below to download the pdf templates:
Happy trick-or-treating. :)
Labels:
felt,
halloween,
sewing for kids,
template,
tutorial
Subscribe to:
Post Comments (Atom)
Followers
Blog Archive
-
▼
2011
(410)
-
▼
October
(41)
- Try This One
- halloween costume parade
- More on a Nominal GDP Target
- The Impact of Economics Blogs
- My Lecture at Princeton
- rollie-pollie pumpkin
- mini cupcake toppers
- The Budget Deficit
- The Rich Get Poorer
- introducing the Silhouette CAMEO
- doll/bear carrier
- Fates to Avoid
- Nordhaus on Energy Economics
- After Keynesian Macroeconomics
- The Latest from Merle Hazard
- ruffly playdate dress
- The Distributional Effects of 9-9-9
- A Target Path for Nominal GDP
- red riding hood cape
- The Increased Role of the Minimum Wage
- Even leftists believe in property rights
- simple felt trick-or-treat bags: templates and tu...
- The Monetary System of the Future?
- simple felt trick-or-treat bags
- The Nobel Prize
- Nobel Speculation
- A Fun New Search Tool
- Krugman on IS-LM
- Policy Uncertainty
- Solow on the History of Thought
- Obama versus Clinton on Tax Policy
- Advice for College Freshmen
- Fantasy Nobel Picks
- David Brooks on Mitt Romney
- Alan Blinder and Glenn Hubbard agree
- Sin Taxes on College Sports?
- crafting memories: Martha Stewart's Handmade Holi...
- kid craft: easy pipe cleaner spiders
- Optimal Stabilization Policy
- Nobel Prize Pool
- The Darwin Economy
-
▼
October
(41)


No comments:
Post a Comment