Pages

Thursday, 31 December 2009

Tablet thoughts

I don't know anything about Apple's tablet, and I generally don't pay much attention to the speculation about their unannounced products. However, John Gruber has a nice post today which discusses the hypothetical Apple tablet.

The best part is the core product question -- how does this new product fit in with all existing products? Revolutionary products are underestimated because we evaluate them relative to existing products. This quote gets it:
Like all Apple products, The Tablet will do less than we expect but the things it does do, it will do insanely well. It will offer a fraction of the functionality of a MacBook‚ but that fraction will be way more fun. The same Asperger-y critics who dismissed the iPhone will focus on all that The Tablet doesn't do and declare that this time, Apple really has fucked up but good.

That was certainly the case with the iPod, or as slashdot put it, "No wireless. Less space than a nomad. Lame."

When considering revolutionary new products, we can not simply compare them with existing products, but must instead compare them with the products that don't yet exist, but should. For example, the PC was more than just an expensive, hard-to-use typewriter -- it was a whole new thing that just happened to have some typewriter features. Obviously this comparison is much more difficult than the "count the checkboxes" approach that we like to use when evaluating the "better mousetrap", but it's critical if we're going to understand or create anything truly new.

I have no idea what Apple is planning to release, but to me the revolutionary product need is in bridging the virtual and physical worlds. If you spend your entire day in front of the computer, this need may not seem real, but if you move between the two worlds you may notice that they are strangely disconnected. For example, imagine that I'm looking at a picture on my computer and want to give you a copy. In the physical world, I would simply hand you the print (I would have gotten double-prints), but with computers it's nearly impossible. Yes, there may be some complicated 10-step process that I can use to share the image, or maybe I can download and install some obscure software, but I'm not going to do that and neither are most other people. Imagine if I instead had a simple (built-in) gesture for passing the photo off to person standing next to me, and it were just as easy as handing them a real photo.

Of course exchanging photos is just one small example of these physical/virtual interactions. It's a whole new category, so many of them, including the most important, haven't been invented yet. However, you can get some ideas by thinking of the marketing cliche where two people are standing around a computer collaborating on something, taking quick notes, working off a recipe, etc. Those images occur in marketing because they are appealing, but they don't occur much in real life because our existing devices and software are awful. Current laptop computers are too bulky, awkward, and keyboard centric (the ui needs to be gesture-centric), and the iPhone is too small and limited. I want something about the size of a notepad that can be used naturally while standing up and walking around, just like an actual pad of paper, except that it's fully integrated with the virtual world as well as the physical world.

I hope this is what Apple is building -- it would be a great product. (or someone else could build it, though honestly I can't imagine anyone besides Apple getting it right)

SYTYC, Toy Society Drop, and UCreate award, apologies, and other year-end wrap-ups

Hi friends!  I hope you all had a very merry Christmas and other happy holidays.  I really didn't mean to take most of the month of December off ... it just kind of happened.  With the new year rapidly approaching, I figured it was time to get back on the horse!

First, an update on So You Think You're Crafty.  Today is the last day to vote on this week's theme, Gifts.  I really enjoyed making my project this week.  With only four crafters left in the competition, I think it is getting easier and easier to spot who made what.   Which project is your favorite this week?

In week 5, I made the "Snowed-In" Ornament, and in week 6, I did the Printable Mitten Gift Tags.  I know the holidays are behind us, but I'll be posting the printable (which actually could still be appropriate during the winter months) and the tutorial for the ornament in January.

Speaking of tutorials, I owe some of you an apology.   Many readers have requested the Plush Tractor tutorial from my first week on SYTYC, hoping to make it as a Christmas gift.  I am really sorry that I didn't get it up in time!  The problem was, I lost the main tractor pattern piece ... I looked everywhere for it and finally decided it must have been thrown away.  But good news!  I started taking down my Christmas tree, and found the pattern piece hanging out in one of my Christmas decoration boxes.  Happy day!  So I am working on that and plan to have it up next week.  Better late than never, right?

This year I participated in The Toy Society's Worldwide Christmas Drop.  You can see my toy drop here.  We walked up to the Santa Barbara Mission and left a Black Apple doll hanging on the fence post at the nativity (which was awesome and included a sheep, goat, and our very favorite ... a mini donkey and baby mini donkey.  eee!)

 Not to rub it in, but this is what Santa Barbara looks like on Christmas Eve:
(photo courtesy of my sister-in-law, Holly)


I missed having a snowy, wintery Christmas for about 5 minutes, and now I'm over it and enjoying the sunshine.


In other happy news, my Quiet Book Templates post was named one of the Top Ten Tutorials of 2009 on UCreate.  What a fun surprise, and I'm in such great company!  Check out the full list for some great tutorials to add to your to-do list.


Finally, can I just say thanks for reading my blog this year?  There are a lot of places to go on the internet, and certainly no shortage of craft blogs these days, so I'm really honored that you stop by to visit mine.  Thanks for your encouraging comments, your lovely emails, and your bloggy friendship.  It means a lot to me!  Happy New Year, and here's to a crafty 2010.

post signature

Friday, 11 December 2009

Glitter Wreath Tutorial


As seen on So You Think You're Crafty, Week 2!  Thanks to everyone who voted for this project.  I know autumn is behind us, but it is so easy to customize this wreath in seasonal or holiday colors.  It would be a great last minute (not to mention inexpensive) Christmas project, if you still need some decorations.


Supplies Needed:
  • Cardstock
  • various shades of fine glitter (do I need to mention that the Martha Stewart glitter is the best?)
  • spray adhesive
  • a wreath form (mine is 10 inches, and I found it at the dollar store)
  • wire for hanging

1.  Cut out a basic leaf shape to use as your template.  Cut out approximately 60 leaves out of cardstock.  I used a 10 inch wreath form.  If you are making a bigger wreath, you will likely need more leaves.

2.  Divide your leaves into groups for glittering.  Spray each group with spray adhesive and coat in glitter.  Shake off the excess.  I used the following colors of Martha Stewart Crafts glitter for this fall wreath:  Smokey Quartz, Yellow Gold, Cinnibar, and Fire Opal.

For a holiday wreath, a selection of green glitters would look nice, especially with a big bow and some red jingle bells. 

For a wreath to last all winter, I'd choose a variety of white and silver glitters for a snowy effect.

 
3.  Add a wire loop to your wreath form for hanging.

4.  Begin hot gluing the leaves to the wreath form, overlapping the bottom tips.  The hot glue gun will melt a styrofoam wreath form a little bit, but it holds well.
 
5.  Continue gluing leaves around the wreath form.  I changed the direction of the leaves at the bottom, but you may want to continue placing them in the same direction all the way around the leaf.

 
6.  Attach a bow.  My secret weapon for attaching bows to wreaths is a paper clip (or maybe everyone does this and it's not such a secret?).  Slide the small end of the paper clip though the back of the knot in your bow.  Then use the large end of the paper clip to attach the bow to your wreath.  This works especially well on a paper wreath like in this project, but I use this trick on all of my wreaths (it also makes it really easy to switch out your ribbons).

Need a bow-tying lesson?  You can find some tips at Martha Stewart.


Hang your wreath and enjoy!

post signature

Monday, 7 December 2009

cozy car caddy tutorial

Thanks to everyone who voted for this project in the So You Think You're Crafty competition!  It was an exciting week.

Without further ado ...

Cozy Car Caddy Tutorial

Materials used:
two pieces of denim (17 x 10 inches and 17 x 6 inches)
one piece of Duck Cloth or other heavy fabric (17 x 10 inches)
gray and yellow felt (gray felt cut to 17 x 3 inches, yellow felt cut into seven 1 x 1/4 inch pieces
White Piping (two 17 inch pieces)
6" belting
1" Velcro
scrap fabric for applique
freezer paper, sponge brush, and acrylic paint
sewing machine and supplies


1.  Cut your fabric.  I used an old pair of jeans for the denim and duck cloth for the front.  Between the two heavy fabrics, it makes for a sturdy car caddy.
 
2.  Take your 17 x 6 inch piece of denim, fold it in half, and press.  This will be used for the car pockets.  Line up the raw edges of the denim with the bottom on the duck cloth and pin in place.  Sew along the bottom edge to secure.
 
3.  Sew vertical lines through all the fabric (3 layers, since the denim is folded in half), spacing the lines 2.75 inches apart.  Be sure to back stitch at the top and bottom.  If your child is especially rough on pockets, you may consider going over each line a second time.
 
4.  Sew your road piece centered in the top half of the duck cloth.  Pin the road dashes in place and sew around each dash using a coordinating thread.  Set the duck cloth aside.

5.  Add a car applique to the denim backing.  Center the car in the bottom half of the denim (see photo below).  When the caddy is folded together, the top half of the denim will be inside.
I used scrap cotton fabric for the car body and felt for the wheels.  You can use a fusible web like Wonder Under to hold your applique in place.  I was all out, so I just pinned and sewed. 
 
6.  Add decorative piping to the top and bottom of the denim backing.  Actually, add the piping all the way around as well ... I only had enough on hand for the top and bottom.  ;)
Line up the raw edge of the piping with the raw edge of the denim.  Pin in place and sew in place
along the existing stitch line on the piping.

7.  Pin the 6 inch piece of belting to the denim fabric, again lining it up centered on the edge of the bottom half of the denim piece (see photo above).  Leave about 1/4 to 1/2 inch overhang, so it will be enclosed between the denim and duck cloth layers when they are sewn together.  Stitch the belting in place using about a 1/4 inch seam (go over it a few times for extra strength)

I forgot to take a few pictures at this point ... bear with me.

8.  I added my velcro pieces last, but now would actually be a better time to do it.  Sew one side of the velcro to the end of your belting strap, and the other piece in the center of your car applique.

9.  Lay the denim piece and the duck cloth piece on top of each other, right sides facing together, and pin.  Sew around the edges using a 1/4 inch seam (try to follow the seam of the piping along the top and bottom).  Leave about a 3 inch gap for turning the caddy right side out.

10.  Turn the caddy right side out and pin the opening closed.  Sew around the entire outside edge again, closing the opening.  Go slowly around the bottom corners - all that denim gets thick.

11.  Fold the caddy in half horizontally and make a crease.  Sew a seam, following the crease, down the middle of the caddy (between the pockets and the road - see the final product photo for seam placement).  This will make the caddy easier to fold up.
 
12.  Using the templates found at the end of this post, cut the numbers out of freezer paper.  If you've never done freezer paper stenciling, you can find easy instructions at Angry Chicken (and everywhere else online - do a google search and I promise you'll find tons of help).

I sponged 3 light layers of white acrylic paint for my numbers (let each layer dry before applying another).

Fill your pockets with matchbox cars, and you are ready to roll.


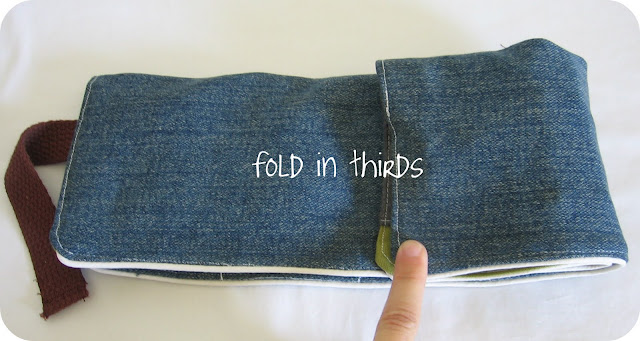
Here's how it folds:  Fold the caddy in half so the road meets the pockets.  Then fold in thirds.  Wrap the strap around the front and velcro closed.


Enjoy!

p.s.  This project is similar to Sharla's Car Cozie at My Little Gems, who I have just recently gotten acquainted with.  If you plan to make this project, you should check out her tutorial as well, since they are different and you might like her construction better. 

Also, check out this awesome car caddy/crayon roll combo project at Create Studio.  Love it!

post signature

S.Y.T.Y.C. update


S.Y.T.Y.C. is back from last week's hiatus, and I've made it through another round!  This week's theme is Snow.  Can you spot my project?

I just barely eeked through Turkey Week with my pom pom turkey table topper.  Would it be okay if I skipped that tutorial?  It was not my proudest crafting moment.  :)  I ditched it in New York.

My goal is to have the tutorials for the glitter wreath and the plush tractor up this week!  Pray for me ... I am less than productive lately.

post signature

Wednesday, 2 December 2009

homemade ornaments

I decorated our Christmas tree this morning while Oscar napped.  He was completely bewildered by it when he woke up.  By this evening, he decided it was ok ... at the very least it is a good target for ramming his truck into.  This should be a fun month.

I usually make a few new ornaments for the tree each year, but didn't quite get around to it for 2009.  Maybe I'll still sneak in a few.  Here are the ornament projects I have my eye on this year:

Origami Glitter Cranes at Zakka Life
Felt Christmas Ornament at Zakka Life
Silhouette Ornaments at Roots and Wings Co.
Argyle Applique Ornament at So September
Simple Sewn Bird Ornaments at Purl Bee

Here are some ornaments I've made in past years:


I like to dress up plain ball ornaments with a silver sharpie and pretty beads attached with a few dabs of hot glue.

 
You can find cheap cardboard ornament forms at most craft stores.  I give mine a generous coat of craft glue and top off with my favorite Martha Stewart glitter.
 
Add a bit of sparkle to pine cones by brushing the tops with rubber cement and dusting with glitter.
 
A few years ago I made these glitter snowflakes for an ornament swap (can you tell I love my glitter?).  I cut the snowflakes out of sturdy cardboard and then coated them with craft glue and lots of glitter.  Really easy!

In a different holiday category, this is the most awesome advent calendar I have ever seen.  Ever!
Advent Calendar at Gingerbread Snowflakes

Yeah ... I don't have ten years to make an advent calendar either.  Do you have ten minutes?  Print up a free advent calendar at Mibo Studio.

post signature

Monday, 30 November 2009

homemade holidays: stocking stuffers for kids

There's still plenty of time to make homemade gifts for this Christmas.  Here are a few easy (and fast!) ideas for stocking stuffers:


Make a crayon roll using the tutorial over at Skip to My Lou.  It is a quick, easy project, and is the perfect size for a stocking.  I exchanged the tie closure for a button and ribbon (I've found ric rac or stretchy ribbon actually works best), which I think is a easier for the little people who can't tie things yet.

 
Make a ball (or two or three) using the free patterns at Grand Revival Designs (her free patterns are located in the right sidebar.  She also offers a free stocking pattern).  I like to add a jingle bell inside the stuffing of the balls I make - my one year old loves it.

post signature

Saturday, 28 November 2009

So I finally tried Wave...

Last week, TechCrunch published a story about me not yet trying Google Wave ("Gmail Creator Thinks Email Will Last Forever. And Hasn't Tried Google Wave"). The is apparently unacceptable, or as one commenter put it, "Paul may have been trying to be cool and ironic, but really he should be ashamed for not having tried Wave yet." I'm not sure if this is because I have an obligation to try all new products, or because my views on the longevity of email will seem hopelessly naive once I try Wave, but either way, I mustn't disappoint the good people of TechCrunch :)

The Google Wave About page and video does a good job of summarizing what Wave is and how it works. If you want to learn more about Wave, I would start there and skip this post. That said, here are my thoughts on Wave:

First off, Wave is clever and full of interesting ideas.

Second, comparisons to Facebook and Twitter are nonsensical. If Twitter were CNN Headline News, Google Wave would be Microsoft Office. Wave is less of a social network and more of a productivity tool. It's Google Docs meets Gmail, or as Google puts it, "A wave is equal parts conversation and document. People can communicate and work together with richly formatted text, photos, videos, maps, and more."

Third, although Wave is very promising, it's clear that it still needs some refinement. This is why Google calls it a "preview release". The trouble with innovative new ideas is that not all of them are worth keeping. While developing Gmail, we implemented a lot of features that were either not released, or not released until much later. Some of the most interesting ideas (such as automatic email prioritization) never made it out because we couldn't find simple enough interfaces. Other ideas sounded good, but in practice weren't useful enough to justify the added complexity (such as multiple stars). Other features, such as integrated IM, simply needed more time to get right and were added later. Our approach was somewhat minimal: only include features that had proven to be highly useful, such as the conversation view and search. It's my impression that Wave was released at an earlier stage of development -- they included all of the features, and will likely winnow and refine them as Wave approaches a full launch. The Wave approach can be a little confusing, but it allows for greater public feedback and testing.

From what I've seen, the realtime aspects of Wave are both the most intriguing, and the most problematic. I think the root of the issue is that conversations need to be mostly linear, or else they become incomprehensible. IM and chat work because there is a nice, linear back-and-forth among the participants. Wave puts the conversation into little Gmail-like boxes, but then makes them update in realtime. The result is that people end up responding (in realtime) to things on other parts of the page, and the chronological linkage and flow of the conversation is lost. I suspect it would work better if each box behaved more like a little chat room. A single Wave could contain multiple chats (different sub-topics), but each box would be mostly self-contained and could be read in a linear fashion.

So now that I've tried Wave, do I expect it to kill email? No. The reason that nothing is going to kill email anytime soon is quite simple: email is universal (or as close to it as anything on the Internet). Email has all kinds of problems and I often hate it, but the fact is that it mostly works, and there's a huge amount of experience and infrastructure supporting it. The best we can do is to use email less, and tools like Wave and Docs are a big help here.

I don't know what Google has planned for Wave or Gmail, but if I were them I would continue improving Wave, and then once it's ready for the whole world to use, integrate it into Gmail. Moving Wave into Gmail would give it a huge userbase, and partially address the "email is universal" problem. They could use MIME multi-part to send both a non-Wave, HTML version of the message, and the Wave version. Wave-enabled mail readers would display the live Wave, while older mailers would show the static version along with a link to the live Wave.  

Friday, 20 November 2009

Open as in water, the fluid necessary for life

"Open" is a great thing. Everyone likes it. Unfortunately, nobody agrees what open is. There are many meanings, but in general, I think "open" must be the opposite of "closed". In the world of abstract things like software, protocols and society, closed is secret, hidden, or locked.

"Closed" limits our mobility, prevents discovery, and discourages new connections. Imagine being in a building where all of the doors are locked or guarded, and it's difficult to move from room to room or leave. A closed world is one where people are forced to stay in their place, sometimes because of physical constraints, but more commonly because they simply don't know where else to go. A closed world is giant prison.

In an open world, people are able to see more clearly, and more easily explore new ideas and possibilities. An open world is more fluid -- people and ideas easily flow over boundaries and other borders. This openness is what makes the Internet so powerful. The Internet is melting the world, but in a good way.

Open standards and open source software are important for making technology open and available to everyone, but it's important to remember that open goes beyond tech. Wikipedia makes knowledge open to everyone. Blogs and YouTube make broadcasting and mass communication open to everyone -- news and events that would have been suppressed in the past are now reaching the whole world.

These things have been discussed to death, but there's another "open" that still seems a little frivolous: our lives. We like to joke (or complain) about people who share every boring detail of their lives and thoughts on Facebook or Twitter, but they may be doing something important.

Most of our happiness and productivity comes from the everyday details of our lives: the people we live and work with, the books we read, the hikes we take, the parties we attend, etc. But how do we choose these things? How do we know what to do, and how do know if we'll like it? The obvious answer is that we do and like whatever the TV tells us to do and like. I'm not certain that's the best answer though.

By sharing more of our own thoughts and lives with the world, we contribute to the global pool of "how to live", and over time we also get contributions back from the world. Think of it as "open source living". This has certainly been my experience with my blog and FriendFeed. Not only do people occasionally say that it has helped them, but I've also met interesting new people and gotten a lot of good leads on new ideas. These are typically small things, but our lives are woven from the small details of everyday living. For example, I saw a good TED talk on "The science of motivation", shared it on FriendFeed, and in the comments Laura Norvig suggested a book called Unconditional Parenting, which turns out to be very good.

The next step is for people to open more of their current activities and plans. This is often referred to as "real-time", but since real-time is also a technical term, we often focus too much on the technical aspect of it. The "real-time" that matters is the human part -- what I'm doing and thinking right now, and my ability to communicate that to the world, right now. We see some of this on Facebook, FriendFeed, and Twitter, and also location-aware apps such as Foursquare, but it's still fairly primitive and fringe. When this activity reaches critical mass, it should be very interesting for society. It dramatically alters the time and growth coefficients in group formation. It enables a much higher degree of serendipity and ad hoc socializing.

The basic pattern of openness is that better access to information and better systems lead to better decisions and better living. This general principal is broadly accepted, but we're just now discovering that it also applies to the minutiae of our lives.

Sharing your boring thoughts and activities may seem narcissistic and self-absorbed at first (I'm still kind of embarrassed about having a blog), but there is virtue and benefit in it. Naturally there will be challenges and fear along the way, but in the long term we're contributing to a more open, fluid society, where people are more able to find happy, productive lives. It also encourages us to be more accepting of others. Everyone is flawed, and the more we see that we aren't alone, the less we need to fear that truth.

People can not truly live and thrive in a prison -- we require freedom and mobility. This may explain my incomprehensible analogy, "Open as in water, the fluid necessary for life".

Go forth and share.

sorry I'm M.I.A.!

I'm in New York on vacation and had every intention of posting this week ... but traveling is always a little more crazy than you expect!

Next week I'll be back with more homemade holiday gift ideas and updates on So You Think You're Crafty.  Tutorials on past projects are in the works!

Did you guess which project was mine last week?  I made the Glitter Wreath.  Thanks to everyone who voted!


post signature

Friday, 13 November 2009

homemade holidays: dishtowels and fabric coasters


Here are a couple of fast and easy sewing projects for the home that would make a great holiday gift.
 
In my new apartment, we are without a dishwasher.  It is slowly eating away at my soul.  But, I have found that pretty dishtowels make the dreaded task just a tiny bit more bearable.  I simply added a strip of fabric to these plain white dishtowels, but you can really go crazy and add some lovely patchwork, like in this tutorial at Sew, Mama, Sew.
 

Use your scraps to whip up some cute quilted coasters.  I just cut and sewed (mine are 4.5 inches square), but if you want full blown instructions there is a good tutorial at Make It From Scratch.


I think a cute coordinating set like this also adds a nice, handmade touch to a kitchen wedding gift.  (err ... Mitzi - these are for you!)

Wednesday, 11 November 2009

homemade holidays: black apple dolls


You know what I love about November?  It still feels like there is plenty of time to make homemade gifts.  Black Apple Dolls are one of my favorite little girl gifts to make.  They are a fast project, easy to customize, and oh so very cute (the free pattern doesn't hurt either).

My favorite in this bunch is the dark-haired twin with the blue flower brooch.  They could all use shoes and winter accessories, but I have to be somewhat realistic about my time.  :)

post signature

Monday, 9 November 2009

fabric travel high chair

There are a lot of sewing/craft blogs I really love, and near the top of that list is this mama makes stuff.  Recently Carrie posted a portable fabric high chair - so awesome!  I thought it would be just perfect for an upcoming trip Oscar and I are taking to NYC for a week of friends and NEW MOON!  wooo!  Yes, I am a Twi-mom, so sue me.  NEW MOON!  :)

Back to the fabric high chair.  I wanted one.  I needed one!  So far, Carrie has not posted the dimensions.   But, it looked easy enough.  3 rectangles of fabric and some velcro ... no biggie.  I estimated the dimensions and sewed one up.  Ta-da!


Like I said, it is three rectangles.  I cut my waist strap to be 6" x 43", but if I were to do it again, I think I would make it about 6 inches shorter (6" x 37").  It doesn't need to be quite so long.

The connector piece is 6" x 4".  The seat piece is 20" x 10".  There is a thin layer of batting between each piece, and a long strip of velcro on either end of the waist strap.
 
Piece of cake right?  I'm curious to see how my measurements match up to Carrie's.  Hopefully someday she'll post instructions so I can make this perfect!

S.Y.T.Y.C week 2

Have you seen the new entries for So You Think You're Crafty? This week's theme is leaves! And I have to say, the ladies crafted their butts off for this challenge. All of the entries are really cool! Make sure you stop by to vote for your favorite. Which one do you think I made?

Also, did you notice the new Giveaway section on the S.Y.T.Y.C. site? There is a giveaway from one of the sponsors, DECOmod Walls, this week. If you love vinyl decor, or just getting free stuff, check it out. :)

Congratulations to the ever-talented Dana, who won the week one challenge with her Harvest Dress and Dinner for Two.  Her tutorials are now posted.

Did you figure out which craft was mine last week?  Thanks to everyone who voted for my tractor!  :)


I did some serious sewing this weekend, and none of it is top secret!  I'll have new projects up very soon.

post signature

Sunday, 8 November 2009

join the felt playhouses flickr group!

Hey ya'll. I have been getting SO many emails and comments from people who have made a felt playhouse. And they are turning out really
cute! I love seeing photos of what you all create.

Since I thought other felt playhouse fans might want to see them as well, I created a felt playhouses flickr group.

Share your photos and join the party!

post signature

Followers

Blog Archive

Powered By Blogger